Thursday, November 26, 2015

Creating Camel routes for Eclipse Kura

This is repost of my DZone article - Creating Camel routes for Eclipse Kura.

Eclipse Kura is the Open Source M2M Software Framework of choice for IoT Gateways, and it's well known for its ease of use and flexibility, and Apache Camel is a message routing engine providing out of the box dozens of connectors to different endpoints.
Eclipse Kura and Apache Camel, when joined together, give developers the possibility to abstract their application logic from both field protocols and data delivery, thus easing and speeding up the development process.
Rhiot Kura Camel quickstart can be used to create Camel router OSGi bundle project deployable into the Eclipse Kura gateway. Rhiot supports Kura gateway deployments as a first class citizen and this quickstart is intended to be used as a blueprint for Camel deployments for Kura. Under the hood Rhiot quickstart uses Camel Kura component to leverage an integration between Kura and Camel . 
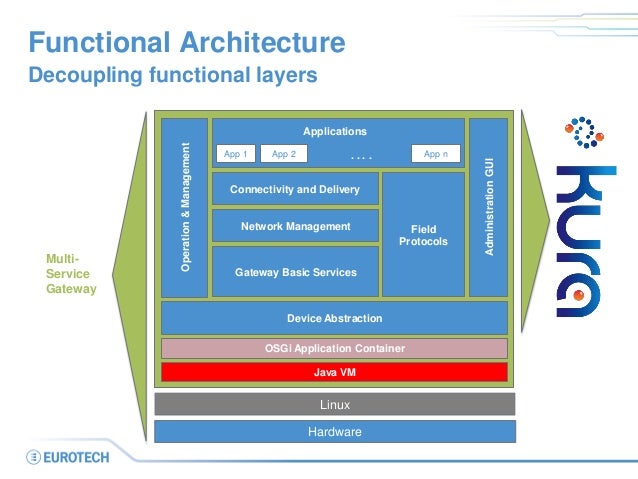
If you are wondering where Kura Camel project fits into the Kura architecture - our quickstart is deployed into the application layer of Kura, with a dedicated Camel context instance per application bundle.


Creating a Kura Camel project

In order to create the Kura Camel project from Rhiot quickstart execute the following commands:
git clone git@github.com:rhiot/quickstarts.git
cp -r quickstarts/kura-camel kura-camel
cd kura-camel
mvn install

Prerequisites

We presume that you have Eclipse Kura already installed on your target device. And that you know the IP address of that device. If you happen to deploy to a Raspbian-based device, and you would like to find the IP of that Raspberry Pi device connected to your local network, you can use the Rhiot device scanner, as demonstrated on the snippet below:
docker run --net=host -it rhiot/deploy-gateway scan
The command above will return an output similar to the one presented below:
Scanning local networks for devices...

======================================
Device type     IPv4 address
--------------------------------------
RaspberryPi2        /192.168.1.100
Keep in mind that /opt/eclipse/kura/kura/config.ini file on your target device should have OSGi boot delegation enabled for packages sun.*,com.sun.*. Your /opt/eclipse/kura/kura/config.ini should contain the following line then:
org.osgi.framework.bootdelegation=sun.*,com.sun.*
A boot delegation of sun packages is required to make Camel work smoothly in an Equinox.

Deployment

In order to deploy Camel application to a Kura server, you have to copy necessary Camel jars and a bundle containing your application. Your bundle can be deployed into the target device by executing an scp command. For example:
scp target/rhiot-kura-camel-1.0.0-SNAPSHOT.jar pi@192.168.1.100:/tmp
The command above will copy your bundle to the /tmp/rhiot-kura-camel-1.0.0-SNAPSHOT.jar location on a target device. Use similar scp command to deploy Camel jars required to run your project:
scp ~/.m2/repository/org/apache/camel/camel-core/2.16.0/camel-core-2.16.0.jar pi@192.168.1.100:/tmp
scp ~/.m2/repository/org/apache/camel/camel-core-osgi/2.16.0/camel-core-osgi-2.16.0.jar pi@192.168.1.100:/tmp
scp ~/.m2/repository/org/apache/camel/camel-kura/2.16.0/camel-kura-2.16.0.jar pi@192.168.1.100:/tmp
Now log into your target device Kura shell using telnet:
telnet localhost 5002
And install the bundles you previously scp-ed:
install file:///tmp/camel-core-2.16.0.jar
install file:///tmp/camel-core-osgi-2.16.0.jar
install file:///tmp/camel-kura-2.16.0.jar
install file:///tmp/rhiot-kura-camel-1.0.0-SNAPSHOT.jar
Finally start your application using the following command:
start 
Keep in mind that bundles you deployed using the recipe above are not installed permanently and will be reverted after the server restart. Please read Kura documentation for more details regarding permanent deployments.

What the quickstart is actually doing?

This quickstart triggers Camel timer event every second and sends it to the system logger using Camel Log component. This is fairy simple functionality, but enough to demonstrate the Camel Kura project is actually working and processing messages. 
The snippet below demonstrates the code of the route:
public class GatewayRouter extends KuraRouter {

    @Override    public void configure() throws Exception {
        from("timer://heartbeat").
                to("log:heartbeat");
    }

    ...

}

If you are curious how can you create more complicated routes connected to Kura internal services, you would be interested in incoming articles demonstrating those features.   
Monday, November 16, 2015

My "IoT for mere mortals" talk at Capgemini Tech event in Wrocław

If you happen to be in Wrocław this Wednesday, be sure to attend my "IoT for mere mortals" talk. The event takes place in Włodkowica 21 pub (which serves pretty decent beer by the way). I will start do the talking around ~18:00. If you wanna hear a gentle introduction to the Internet Of Things, my talk is for you.

After the presentation I plan to stay for some beers at the venue, so you're more than welcome to join me :) .

Many thanks for Capgemini Poland for inviting me again. I really enjoyed my last visit at Capgemini Tech event where I delivered "Containerize it!" talk.

See you!

Thursday, November 5, 2015

IoT AMQP backend in seconds (with Rhiot)

This is repost of my DZone article - Building an IoT AMQP Backend in Seconds With Rhiot.
The AMQP is becoming widely adopted as the protocol of choice the communication between an IoT gateway and a data center. If you would like to rapidly create the AMQP backend service that can be immediately ready for your gateways and devices, the Rhiot AMQP quickstart will be more than interesting for you.

The AMQP cloudlet quickstart can be used as a base for the fat-jar AMQP microservices (aka cloudlets). If you wanna create a simple backend application capable of exposing AMQP-endpoint and handling the AMQP-based communication, the AMQT cloudlet quickstart is the best way to start your development efforts.

Creating and running the AMQP cloudlet project

In order to create the AMQP cloudlet project execute the following commands:
git clone git@github.com:rhiot/quickstarts.git
cp -r quickstarts/cloudlets/amqp amqp
cd amqp
mvn install
To start the AMQP cloudlet execute the following command:
java -jar target/rhiot-cloudlets-amqp-1.0.0-SNAPSHOT.jar
That is really all you need to expose the AMQP message broker to the external devices and gateways.
You can also build and run it as a Docker image (we love Docker and highly recommend this approach):
TARGET_IMAGE=yourUsername/rhiot-cloudlets-amqp
mvn install docker:build docker:push -Ddocker.image.target=${TARGET_IMAGE}
docker run -it ${TARGET_IMAGE}

AMQP broker

By default AMQP cloudlet quickstart starts embedded ActiveMQ AMQP broker on 5672 port. If you would like to connect your cloudlet application to the external ActiveMQ broker (instead of starting the embedded one), run the cloudlet with the BROKER_URL environment variable or system property, for example:
java -DBROKER_URL=tcp://amqbroker.example.com:61616 -jar target/rhiot-cloudlets-amqp-1.0.0-SNAPSHOT.jar
...or...
docker run -e BROKER_URL=tcp://amqbroker.example.com:61616 -it yourUsername/rhiot-cloudlets-amqp

Sample chat application

The AMQP cloudlet quickstart is in fact a simple chat application. Clients can send the messages to the chat channel by subscribing to the broker and sending the messages to the chat AMQP queue.
$ amqp-client -h localhost -p 5672 --topic chat "Hello, this is the IoT device!"

The clients can subscribe to the chat updates by listening on the chat-updates AMQP topic - whenever the new message has been sent to the chat channel, the clients registered to the chat-updates will receive the updated chat history.
$ amqp-client -h localhost -p 5672 --subscribe --topic chat-updates
Hello, this is the IoT device!
I just wanted to say hello!
Hello, IoT device. Nice to meet you!

The quickstart also exposes the simple REST API that can be used to read the chat history using the HTTP GET request:
$ curl http://localhost:8180/chat
Hello, this is the IoT device!
I just wanted to say hello!
Hello, IoT device. Nice to meet you!

Architectural overview

When AMQP cloudlet is started with the embedded ActiveMQ broker, the architecture of the example is the following:
When you connect to the external ActiveMQ broker (using BROKER_URL option), the architecture of the example becomes more like the following diagram:

The quickstart code

You may be wondering how much code do you need in order to take the advantage of the presented AMQP functionality. Below is all code used by our quickstart to handle the AMQP connectivity: 


import io.rhiot.steroids.camel.CamelBootstrap;

import java.util.LinkedList;
import java.util.List;

import static io.rhiot.steroids.activemq.EmbeddedActiveMqBrokerBootInitializer.amqpJmsBridge;
import static org.apache.commons.lang3.StringUtils.join;

public class ChatCloudlet extends CamelBootstrap {

    static final List chat = new LinkedList<>();

    @Override
    public void configure() throws Exception {
        from(amqpJmsBridge("chat")).process(
                exchange -> chat.add(exchange.getIn().getBody(String.class))
        ).process(
                exchange -> exchange.getIn().setBody(join(chat, "\n"))
        ).to(amqpJmsBridge("topic:chat-updates"));
    }

}

And below is the code used to start the REST API mentioned before:

import io.rhiot.steroids.camel.Route;
import org.apache.camel.builder.RouteBuilder;

import static org.apache.commons.lang3.StringUtils.join;

@Route
public class ChatRestApiRoutes extends RouteBuilder {

    @Override
    public void configure() throws Exception {
        restConfiguration().component("netty4-http").host("0.0.0.0").port(8180);

        rest("/chat").get().route().process(
                exchange -> exchange.getIn().setBody(join(ChatCloudlet.chat, "\n"))
        );
    }

}

As you can see, Apache Camel is the first class citizen in the Rhiot world. In order to make Camel connectivity easier, Rhiot comes with the static DSL methods like  EmbeddedActiveMqBrokerBootInitializer.amqpJmsBridge which can be used to easily create the Camel endpoints associated with the broker used by the quickstart.